
Taking a self portrait can be a painful experience. Aside from trying to nail the right expression and light, there is the small matter of actually getting the camera to take the shot and getting yourself in focus. Here are some tips to help tackle the technical side of taking a self portrait.
Getting the right angle and light
As with any portrait, getting the subject (you!) well lit is very important. A really forgiving light is “doorway light” which you can get by sitting just behind the threshold of a front/back door with the camera outside pointing towards you. For something more atmospheric, get very near a window and point your nose towards the light or slightly sideways to the light. The smaller the window and the more contrasty the shot will be, so for a dramatic look you can draw the curtains and leave a small opening to light your face.
I would recommend avoiding shooting at a very wide angle unless you want to include a lot of your surroundings. Zooming in will also give you more flattering facial proportions. Avoid having the camera below eye level unless you want your chin to be a prominent feature in the shot.
Placing the camera
A very useful accessory for taking a self portrait is of course a tripod. If you don’t own a tripod don’t worry, you can simply prop the camera up on a table or chair. To compose your shot if the camera is at an awkward angle and you can’t easily put your eye on the viewfinder, switch on the live view function (if available) to see the scene through the LCD screen instead.
How to focus
Focussing can be quite tricky of course. To give yourself more margin for error, avoid shooting at a very low aperture such as F1.4-F2.2. Anything from F5.6 should be a lot more forgiving if you don’t exactly nail the focussing distance as it will give you a slightly longer depth of field.
Here are two different ways of focussing for a self portrait:
1 – The reverse focussing technique
OK, I just made up that term, but it describes quite well what we’re trying to do: you need to set the focussing distance to the distance between yourself and the tripod (or the place where you’re going to rest the camera).
The easiest way to do this is to grab the camera, then sit (or stand) where you’re planning to pose and get the camera to focus on the tripod by half pressing the shutter. The focussing distance is then set for you to the correct distance (i.e. the distance between you and the tripod).
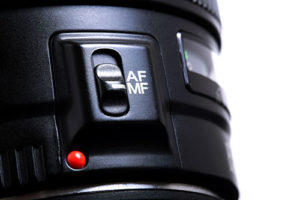
To keep that distance locked and avoid having the camera automatically attempt to refocus when you next press the shutter, switch the focus to M (of MF for Manual Focus) by using the little switch on the side of the lens barrel.
Then, carefully place the camera back on the tripod, without touching the focus ring which would change the focus distance.
Once you’re all done, remember of course to switch your camera back to Auto-Focus!
2. The teddy bear technique
If the reverse focussing technique isn’t working for you, simply place a prop (like a teddy bear!) where you’re planning to sit, camera on the tripod, auto focus on the teddy bear. Once you’ve triggered the shot, run to the teddy bear, give it a quick cuddle for reassurance and then chuck it across the room and sit in its place, looking poised and smiling sweetly.
How to trigger the shot
To trigger the shot, you can simply use the self timer or, if you have one, a remote control. Some self timers will take more than one photo at a time for you which helps capture more expressions in one go.
Interval Timer Shooting
If you’re lucky enough to own a higher spec Nikon camera, the Interval Timer Shooting functionality is a godsend for self portraits. You can program the camera to take shots every X seconds which gives you the chance to take lots of portraits in one go and relax in front of the camera. The camera will even refocus for you in between each shot so you don’t even have to worry about staying in place. Check your manual for instructions on how to use this functionality.
Sel portraits on the camera phone
If you’re taking the self portrait on a camera phone, you can either hold it at arm’s length for a true #selfie look, or you can use the self-timer function (look for the timer icon on the camera screen or settings) which gives you the chance to put the phone down and take a few seconds to step back and get into position. Some phones will also take more than 1 image at a time on the self timer so that you can try different poses or expressions in one go.
Got any questions?
I'd love to hear from you! You can contact me by email at contact@stephaniebelton.com or by phone on 07900825463.
I also run a friendly Facebook group for those who have attended or are thinking about attending my training: Stephanie Belton Photography Training Group